Persisting RancherOS state

Recently I set about installing RancherOS. This was just to have a look and see what use cases it might help with. I chose to install RancherOS to a VM. In my case, VMware workstation. A roadblock I hit was providing an SSH key to the cloud-config.yml file.
The roadblock specifically, how can I send a file to a system I don’t have a password or SSH key for?
This article covers, generating an SSH key, SSH access to live CD and installation to hard disk.
Requirements and Prior reading
Before starting with RancherOS, it’;s a good idea to read the documentation. This is available here. We will be performing a bare metal install to disk, specific documentation is here.
You need to download the RancherOS ISO image. See Releases.
Your VM does not require much in the way of resources. 1vCPU and at least 1GB of RAM. The minimum RAM requirement is 512MB. However, 1GB is recommended for the installation. For my testing, I have only allocated 20GB of disk space, adjust as required.
Booting RancherOS for the first time
Configure your VM and point to the RancherOS ISO image as boot media. The ISO image is a live boot disk and will auto login to the account rancher. We do not know the rancher password. This presents an issue with accessing via SSH. We will need to create a password.
Run the following commands:
sudo su -
passwd rancher
Linux and MacOS
Open a terminal window. At the shell prompt, type the following command:
ssh-keygen -t rsa
The ssh-keygen program will prompt you for the location of the key file. Press Return to accept the defaults. You can optionally specify a passphrase to protect your key material. Press Return to omit the passphrase. The output of the program will look similar to this:
Enter file in which to save the key (/home/cube8021/.ssh/id_rsa):
Created directory '/home/cube8021/.ssh'.
Enter passphrase (empty for no passphrase):
Enter same passphrase again:
Your identification has been saved in /home/cube8021/.ssh/id_rsa.
Your public key has been saved in /home/cube8021/.ssh/id_rsa.pub.
Windows
On your Windows workstation, go to Start > All Programs > PuTTY > PuTTYgen. The PuTTY Key Generator displays.
Click the Generate button and follow the instructions. Once key generation has finished, you will be presented with the results:
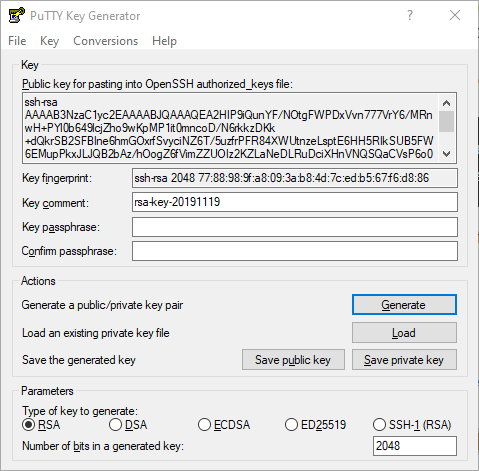
Click Save Private Key to save the private key to a file. Take note of the full path of the private key file, which is especially important if you save it under your Documents directory. Repeat the process for the public key, or simply copy the public key from PuTTY’s text area into your clipboard and save it as a text file.
Close the PuTTY Key Generator.
Using the SSH session we opened before, we will create our cloud-config.yml file.
Running the following command:
vi cloud-config.yml
Type in the relevant information for your system. I have provided my cloud-config.yml file as an example.
#cloud-config

hostname: rancher-node01

rancher:
  network:
    interfaces:
      eth*:
       dhcp: false
      eth0:
       address: 172.27.3.31/24
       gateway: 172.27.3.13
    dns:
     nameservers:
      - 1.1.1.1
      - 1.0.0.1

ssh_authorized_keys:
  - ssh-rsa AAAAB3NzaC1yc......aVvEZIDjc1mahwfI7IFh8iZ RancherOS
Validating a Configuration File:
sudo ros config validate -i cloud-config.yml
Installing RancherOS to disk is a single line command. If your VM does not have internet access, go back to the documentation link. Rancher provides details on that method.
sudo ros install -c cloud-config.yml -d /dev/sda
Note: For doing mass deployments, I normally to store the cloud-config.yml on a shared web server.
sudo ros install -c https://ros.support.tools/rancher-node01.yml -d /dev/sda
Finally reboot the VM to apply changes:
sudo reboot